A leaking roof is one of the most stressful problems a homeowner can face. Water stains on the ceiling, damp walls, and the sound of dripping after rain are all signs that something is wrong. The good news is that many roof leaks are fixable without calling a professional right away.
However, doing the job correctly matters more than doing it quickly. Using the wrong materials or skipping important steps can make the problem worse. Therefore, this guide walks you through everything you need to know — from finding the leak to sealing it properly. Whether you are a first-time DIYer or someone with basic home repair skills, this step-by-step approach will help you get the job done right.
Why Acting Fast Is So Important
Roof leaks rarely get better on their own. In fact, they almost always get worse over time. A small drip can quickly turn into a major water intrusion. Once water gets into your home, it can damage insulation, weaken wooden beams, cause mold growth, and ruin ceilings and walls.
Additionally, the longer you wait, the more expensive the repair becomes. A minor patch job today could save you thousands of dollars in structural repairs later. Therefore, as soon as you notice signs of a leak, it is time to take action.
Safety First: What You Need to Know Before You Start
Working on a roof carries real risks. Before you climb up there, take a moment to prepare properly. Your safety is more important than any repair.
Here are some key safety steps to follow:
- Never work on a wet or icy roof. The surface becomes dangerously slippery.
- Always use a sturdy ladder that is secured at the base.
- Wear rubber-soled shoes with good grip.
- Use a safety harness if your roof has a steep pitch.
- Work with a partner whenever possible. Having someone on the ground adds an extra layer of safety.
- Avoid working during strong winds or stormy weather.
If the roof feels unsafe to walk on, or if the damage is extensive, it is always best to call a licensed roofing contractor. Your safety comes first, every time.
Step One: Find the Source of the Leak
This is often the hardest part. Water is tricky. It does not always leak directly above where you see the damage inside your home. Water travels along beams, rafters, and underlayment before it drips down to your ceiling.
Start inside the attic if you have one. On a dry day, look for water stains, dark spots, or any signs of moisture on the wood. Trace the trail as far up as you can. Mark the spot with chalk so you can find it when you go outside.
On the roof itself, look for obvious signs of damage. Missing or cracked shingles are a common culprit. Additionally, check around chimneys, skylights, vents, and roof valleys. These transition areas are where leaks most often begin because they involve joints and flashing, which can loosen or corrode over time.
If you cannot find the leak visually, use a garden hose. Have a helper inside the attic while you slowly run water over different sections of the roof. Start low and work your way up. When your helper sees water, you have found the source.
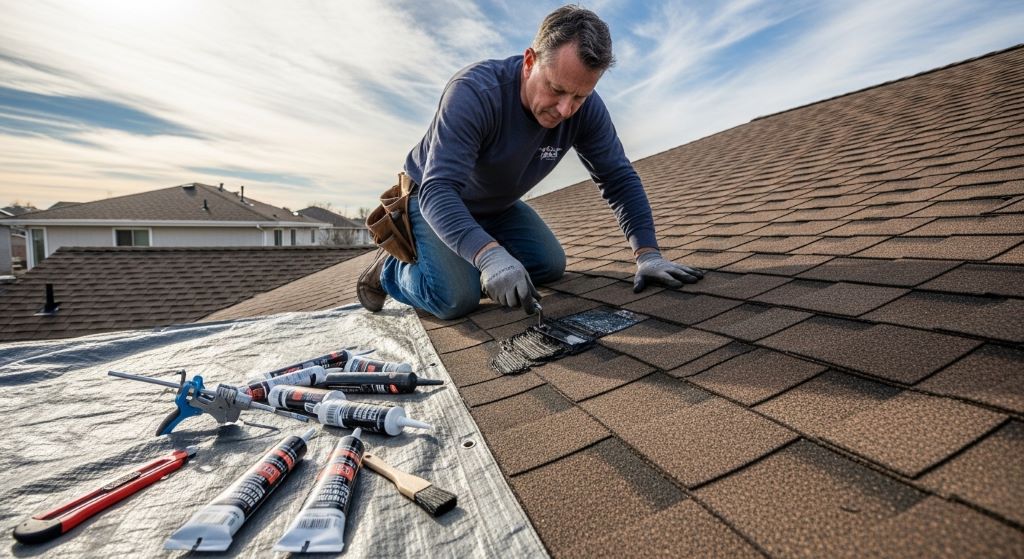
Step Two: Gather the Right Materials
Using the right materials is critical when you want to fix roof leaks properly. The wrong sealant or the wrong type of patch can fail within months, leaving you back where you started.
Here is what you will likely need depending on the type of repair:
- Roofing nails and a hammer or nail gun
- Roofing cement or asphalt roof sealant
- Replacement shingles that match your existing roof
- Roofing felt or underlayment
- Flashing tape or metal flashing
- A pry bar for removing damaged materials
- A utility knife for cutting shingles or underlayment
- A caulking gun for applying sealant
- A wire brush for cleaning surfaces before sealing
- Work gloves and safety glasses
Take a photo of your existing shingles and bring it to the hardware store. This helps you match the color, style, and material as closely as possible. A mismatched shingle does not just look bad — it can also signal different aging rates, which may lead to problems down the road.
Step Three: Remove the Damaged Materials
Once you have located the leak and gathered your supplies, it is time to remove what is broken or worn out. Do not try to patch over damaged shingles or cracked flashing. That approach rarely lasts. Instead, remove the problem materials cleanly so you have a solid base to work with.
To remove a damaged shingle, gently lift the edges of the surrounding shingles. Use your pry bar to remove the roofing nails holding the damaged shingle in place. Slide the shingle out carefully. Try not to disturb the shingles around it more than necessary.
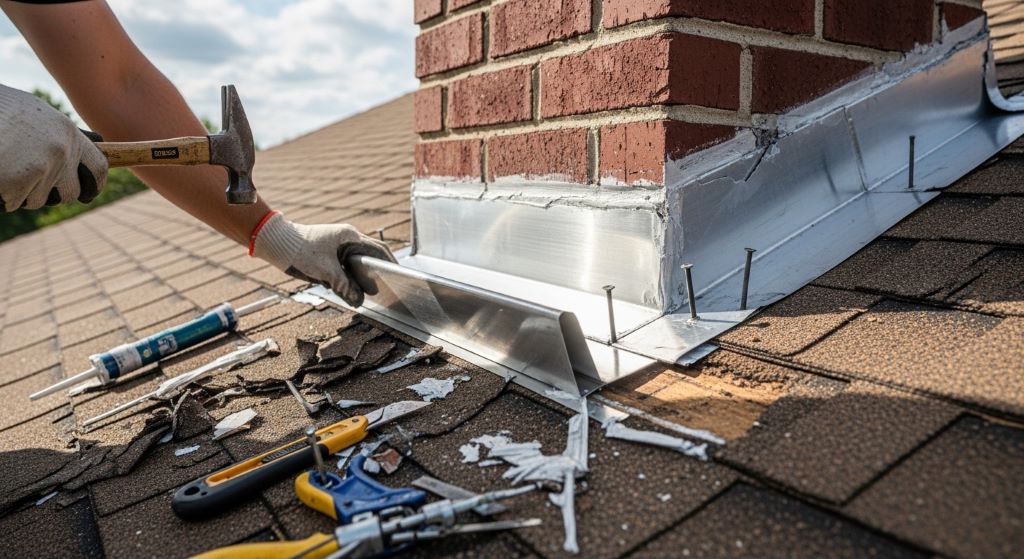
If the problem is with the flashing around a chimney or vent, use the pry bar to carefully lift it away from the surface. Check the area underneath for any rot or damage to the wood. If the decking beneath is soft or crumbling, that section will need to be repaired or replaced before you seal the roof.
Step Four: Repair or Replace the Damaged Area
Now comes the actual repair. The approach depends on what caused the leak.
Replacing a Damaged Shingle
Slide the new shingle into place where the old one sat. Align it carefully with the surrounding shingles. Nail it down using roofing nails at the correct spacing — typically four nails per shingle, positioned just below the adhesive strip.
Apply a small amount of roofing cement under the edges of the overlapping shingles above the new one. Press them down firmly. This seals the nail heads and prevents water from getting underneath. Additionally, seal the edges of the new shingle where it meets its neighbors.
Fixing Cracked or Separated Flashing
Flashing is the thin metal sheeting used to seal joints and transitions on a roof. When it cracks, lifts, or corrodes, water finds a way in very quickly. If the flashing is still structurally sound but just separated from the surface, you can reseal it using roofing cement or flashing tape.
Clean the area thoroughly with a wire brush before applying any sealant. Remove any old, crumbling caulk or cement first. Then apply a generous, even layer of roofing cement and press the flashing back down firmly. Smooth the edges to avoid any ridges where water could pool.
If the flashing is badly corroded or bent out of shape, replace it entirely. Cut a new piece of metal flashing to size and secure it with roofing nails. Seal all edges and nail heads with roofing cement.
Sealing Small Cracks and Gaps
Sometimes the leak comes from a small crack or gap rather than a full missing shingle. In these cases, roofing cement applied with a caulking gun is often enough. Clean the surface first. Then fill the crack completely and smooth it out with a putty knife. Apply a second coat once the first one dries for extra protection.
Step Five: Test Your Repair
Once the repair is complete, do not assume the problem is solved. Testing your work is an important step that many people skip. Use the garden hose method again. Run water slowly over the repaired area while your helper watches inside the attic or ceiling.
Wait several minutes before declaring the repair a success. Water can be slow to move through layers of material. If no water appears inside after a thorough test, your fix is working. However, if water still gets through, you may need to inspect the area again and look for a secondary leak point you missed earlier.
Step Six: Prevent Future Leaks
Fixing the current leak is only half the job. Taking steps to prevent future leaks will save you a great deal of time, money, and frustration. Regular roof maintenance is the key to a long-lasting, watertight roof.
Here are some preventative measures to consider:
- Inspect your roof at least twice a year, ideally in spring and fall.
- Clean your gutters regularly to prevent water from backing up under the shingles.
- Trim overhanging tree branches that can scrape or damage the roof surface.
- Check the condition of flashing around chimneys, vents, and skylights after heavy storms.
- Replace cracked or missing shingles as soon as you notice them.
- Apply a waterproof roof sealant every few years as an added layer of protection.
These DIY roofing tips are simple but highly effective. Consistent attention to your roof’s condition means catching small problems before they become expensive ones.
When to Call a Professional
Some roof repairs are beyond the scope of DIY work. If the leak is coming from multiple areas, if the roof decking is rotten, or if you are dealing with a flat roof with membrane damage, it is time to call in a professional roofer.
Furthermore, if your roof is more than 20 years old and showing widespread wear, a full replacement may be more cost-effective than repeated patching. A professional inspection can give you a clear picture of the overall condition and help you make an informed decision.
Conclusion
A leaking roof does not have to become a disaster. When you act quickly, use the right materials, and follow a careful process, you can fix roof leaks effectively and protect your home from further damage.
Start by locating the source of the leak accurately. Then gather quality materials suited to the specific type of repair. Remove damaged shingles or flashing completely before installing new ones. Test your repair thoroughly, and then put a maintenance plan in place to keep your roof in top shape going forward.
These DIY roofing tips are designed to give you the confidence and knowledge to handle common roof repairs on your own. However, always prioritize safety and know when to call a professional. Your home is one of your biggest investments — protect it well.
Frequently Asked Questions
How do I know if I have a roof leak or a condensation problem?
Roof leaks usually appear after rain and are localized to one area. Condensation, on the other hand, tends to spread across a wider surface and appears in cold weather. Check your attic for signs of moisture on the rafters or insulation to help determine the source.
Can I fix a roof leak from the inside?
A temporary fix from inside — such as placing a patch over a cracked area in the attic — can slow the damage while you prepare for a proper outside repair. However, it is not a long-term solution. The actual repair must be done on the exterior of the roof to be effective.
How long does roofing cement last?
Quality roofing cement typically lasts between five and ten years, depending on weather exposure and the brand used. In areas with extreme heat or heavy rain, you may need to reapply it more frequently. Always choose a product rated for your climate.
What is the best time of year to repair a roof?
Late spring through early fall is generally the best time for roof repairs. Mild temperatures allow roofing cement and sealants to cure properly. Cold temperatures can make materials brittle and harder to work with, so avoid repairs in freezing conditions when possible.
How much does it cost to fix a roof leak yourself versus hiring a professional?
DIY repairs can cost as little as $20 to $100 for materials like shingles, roofing cement, and flashing tape. Professional repairs typically range from $150 to $1,500 or more, depending on the extent of the damage. For small, accessible leaks, doing it yourself is a very cost-effective option.
Related Topics:
How to Fix a Loose Stair Railing (Home Safety)
How to Pick the Best Climbing Rope for Safety and Performance in 2026