Installing a new door frame can transform any room in your home. Whether you’re renovating an old space or building new, this project requires careful planning and the right approach. Many homeowners find this task challenging, but with proper guidance, it becomes manageable. The kindle3 books at Visual Eyes Decor offer additional home improvement resources to complement your DIY journey.
A door frame serves as the foundation for your door installation. It provides structural support and ensures proper alignment for smooth operation. Additionally, a well-installed frame enhances your home’s security and energy efficiency. Therefore, taking time to do this job correctly pays off in the long run.
When you’re ready to start installing a door frame, proper preparation makes all the difference. However, rushing through this process often leads to costly mistakes and frustration later.
Essential Tools and Materials
Before beginning your project, gather all necessary tools and materials. This preparation saves time and prevents interruptions during installation. Moreover, having everything ready ensures you can work efficiently from start to finish.
You’ll need a drill with various bits for different materials. Additionally, a level ensures your frame sits perfectly straight. A measuring tape helps verify dimensions throughout the process. Furthermore, a saw allows you to make precise cuts when needed.
Material-wise, you’ll require wood screws of appropriate lengths. Shims help adjust the frame for perfect alignment. Wood glue strengthens joints and connections. Therefore, quality materials contribute significantly to your project’s success.
Safety equipment protects you during installation. Safety glasses shield your eyes from debris. Work gloves provide better grip and protect your hands. Additionally, a dust mask prevents inhalation of particles during cutting or drilling.
Measuring Your Opening
Accurate measurements form the foundation of successful door frame installation. Start by measuring the rough opening’s width at three points: top, middle, and bottom. However, walls aren’t always perfectly straight, so these measurements might vary slightly.
Next, measure the height on both sides and in the center. Write down all measurements to reference later. Additionally, check the opening for square by measuring diagonally from corner to corner. Equal diagonal measurements indicate a square opening.
Wall thickness affects your frame selection and installation approach. Measure from the finished wall surface on one side to the finished surface on the other side. Therefore, this measurement determines the jamb width you’ll need.
Consider the door’s swing direction during your planning phase. This decision affects how you position the frame and hinges. Furthermore, local building codes might specify requirements for door swing directions in certain situations.
Preparing the Opening
Clean the rough opening thoroughly before installation begins. Remove any debris, old nails, or protruding materials. Additionally, check for any structural issues that need addressing before proceeding.
Examine the header and studs for level and plumb conditions. Use a level to identify any irregularities. However, minor variations can usually be corrected during installation with careful shimming.
Insulation around the opening helps with energy efficiency. Check existing insulation and add more if necessary. Moreover, proper insulation prevents drafts and reduces energy costs over time.
Mark stud locations clearly for easier screw placement later. Additionally, identify any electrical wiring or plumbing that might interfere with your installation. Therefore, taking time for thorough preparation prevents surprises during installation.
Frame Assembly Techniques
Pre-hanging your door frame saves time and ensures better results. Start by laying out the head jamb and side jambs on a flat surface. Additionally, check that all pieces are the correct size before assembly.
Apply wood glue to the joints before securing with screws. This combination creates stronger connections than screws alone. However, work quickly as wood glue sets relatively fast.
Drill pilot holes to prevent splitting, especially near the ends of boards. Additionally, countersink screws slightly below the surface for a professional appearance. Therefore, attention to these details improves your finished product’s quality.
Check the frame for square during assembly using the diagonal measurement method. Adjust as needed before the glue sets completely. Furthermore, a square frame ensures your door will operate smoothly for years to come.
Installation Process
Position the assembled frame in the rough opening carefully. Start by centering it horizontally and vertically. Additionally, ensure the hinge side sits plumb using your level.
Begin securing the frame at the hinge side first. Drive screws through the jamb into the wall studs. However, don’t fully tighten these screws initially to allow for adjustments.
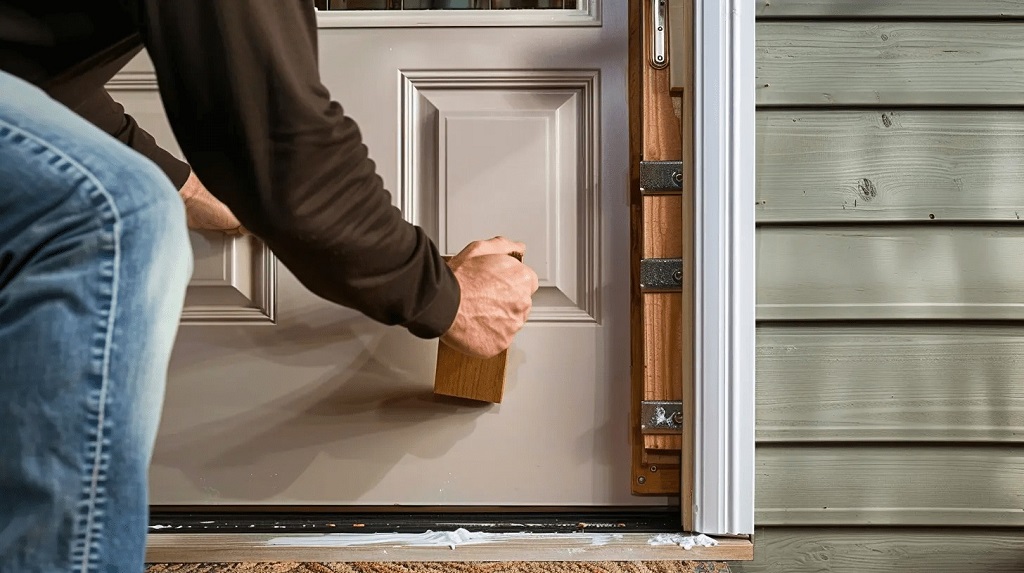
Install shims between the frame and rough opening to maintain proper spacing. Place shims behind each hinge location and at the strike plate area. Moreover, add shims every 16 inches along the frame for adequate support.
Check the reveal around the frame perimeter for consistency. The gap between the frame and rough opening should be relatively uniform. Therefore, adjust shims as needed to achieve this consistency.
Common Mistakes to Avoid
Skipping the measurement verification step leads to costly errors. Always double-check dimensions before cutting or installing materials. Additionally, measure twice and cut once remains excellent advice for any woodworking project.
Inadequate shimming causes doors to bind or not close properly. Use enough shims to support the frame adequately without over-tightening. However, too many shims can bow the frame and create problems.
Ignoring the plumb and level requirements results in operational issues. A frame that’s not properly aligned affects door function significantly. Furthermore, these problems often worsen over time as the house settles.
Rushing through the installation process increases mistake likelihood. Take time to check your work at each step. Moreover, patience during installation saves time and frustration later when problems arise.
Finishing Touches
Trim installation completes your door frame project professionally. Choose trim styles that complement your home’s existing architecture. Additionally, properly installed trim covers any gaps around the frame perimeter.
Caulk small gaps between the frame and trim for a finished appearance. Use paintable caulk that matches your planned finish. However, avoid over-caulking, which creates a messy appearance.
Sand any rough edges or imperfections before applying finish materials. Additionally, fill any visible screw holes with wood filler for a smooth surface. Therefore, proper preparation ensures your paint or stain looks professional.
Apply primer and paint or stain according to manufacturer recommendations. Multiple thin coats produce better results than single thick applications. Furthermore, quality finishes protect your investment and enhance your home’s appearance.
Conclusion
Installing a door frame successfully requires careful planning, proper tools, and attention to detail. From accurate measurements to final finishing touches, each step contributes to the project’s overall success. Additionally, taking time to understand the process and avoid common mistakes ensures professional-looking results.
Remember that patience and precision yield better outcomes than rushing through installation. Therefore, approach this project methodically and don’t hesitate to double-check your work at each stage. With practice and proper technique, installing door frames becomes a manageable DIY skill that adds value to your home.
Read More Also: Reasons Lakefront Property in Guntersville AL Is the Smartest Investment This Year
Frequently Asked Questions
What tools do I absolutely need for installing a door frame?
Essential tools include a drill, level, measuring tape, saw, screws, shims, and safety equipment. Additionally, you’ll need wood glue and appropriate fasteners for your specific installation.
How do I know if my rough opening is the right size?
Measure the opening’s width and height at multiple points, then add 2-3 inches to your door’s dimensions. However, check manufacturer specifications for exact clearance requirements for your specific door.
Can I install a door frame in an existing opening?
Yes, but you’ll need to remove the old frame first and assess the rough opening’s condition. Additionally, you might need to make repairs or adjustments before installing the new frame.
Why is my door frame not sitting square in the opening?
Uneven floors, walls, or ceilings can affect frame alignment. Therefore, use shims to adjust the frame position and ensure it sits plumb and level throughout the installation.
How long should I wait before hanging the door after frame installation?
If you used wood glue during assembly, wait at least 24 hours for complete curing. However, you can typically hang the door immediately if you only used mechanical fasteners.